Creating a recipe web site using GitHub and Netlify
These are the instructions to set up the GitHub repository with the template provided and then use this through Netlify to build a static web site.
YouTube playlist
I have put together a YouTube playlist which covers all of this details here.
For the following processes I suggest that you use Google Chrome rather than Apple Safari
- Create a free account on GitHub.com (You may already have an account)
- Create a new repository from this template
- Once logged in go to this site in another tab: https://github.com/Pageboy/student_recipes
- see the green button
Use this templateHit that andCreate a new repository - You will need to name this repository. Remember what you called it
- make sure you make this Public
You should now have a repository built on this template. You can leave this site open for moment . Your site assets are stored here but the site will be built from these files at Netlify.

Steps to get working with this template
In Github
- Create an account on GitHub
- After creating an account on GitHub, you first need to create new repository by cloning this template: https://github.com/Pageboy/student_recipes
- You will now have a name for the repository and your GitHub username.
- Keep the GitHub window open in your browser (because we will need to come back to this in a short while)
Netlify is where we build your site
- In another browser tab, go to netlify.com
- Login with your GitHub credentials
- create a
New Site with Git - put in the name of the GitHub repository that you created above.
- Your GitHub repository will be built as a web site with a randomly chosen URL. Something like
juicy_peach_9965.netlify.app. - Now change the first part of this URL to something that you want. In other words, the juicy_peach_9965 part can change to something that has not been taken (eg: mytastyrecipes.netlify.app)
- Keep the Netlify window open and do not sign out
GitHub is where the files are located and updated.
Netlify needs to have permission to take your files from GitHub and build the site every time you make changes. Netlify needs 2 codes - an ID and a secret.
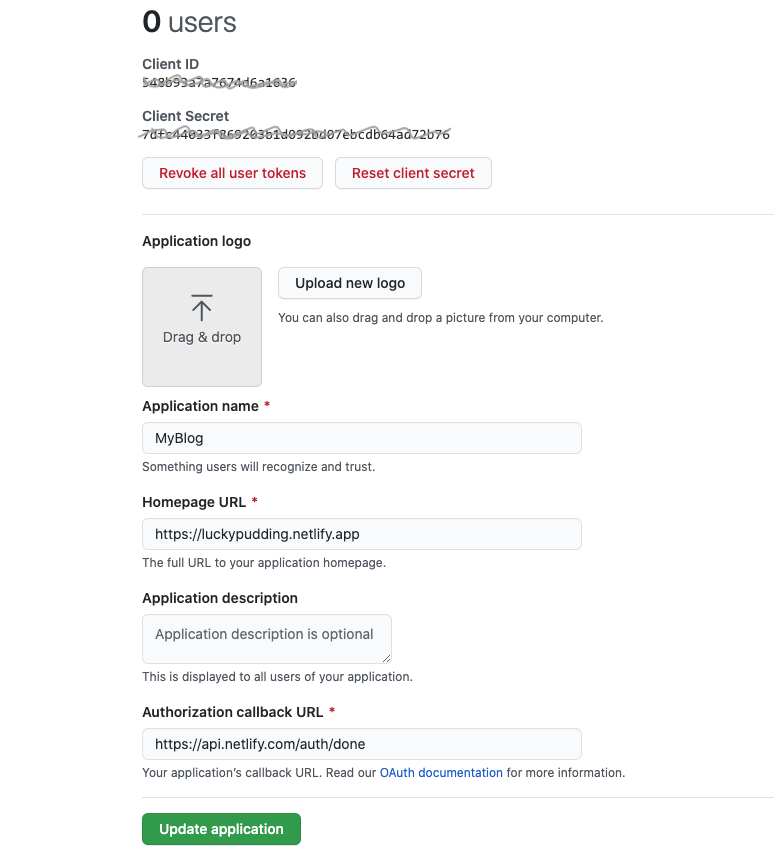
Now in Github, go to your GitHub account and on the left side at the bottom find Developer settings and then see OAuth Apps. In here you need to add a new app and after putting in the details (enter the complete URL of your site) you should be provided with a Client ID and a Client Secret. We need these 2 items in Netlify. Now go back to the Netlify window.
You will also need to enter the callback term in the last box. This should be exactly like this:
https://api.netlify.com/auth/done
In Netlify
I hope you can see why I suggested keeping the 2 browser windows / tabs open now. - Go to Site Settings > Access control > Scroll to the bottom and select OAuth > GitHub. - Paste in here the 2 codes from GitHub, Client ID and Client Secret. Once you have entered these codes we need to go back to GitHub to make some essential settings so that the system knows about your chosen URL / web site name.
So back to the GitHub window then.
Back in Github you can now make some basic edits
You can edit a few settings directly in GitHub so we can begin using the CMS for the other settings. The minimum settings that need changing are in 2 files:
In the Admin folder
In the admin folder find config.yml You need to edit some lines in this file.
backend:
  name: github
  repo: githubusername/yourrepositoryname # Path to your GitHub repository
  branch: master # Branch to update (master by default)
  site_domain: yoursite.netlify.app #Your site on netlify
  use_graphql: true

show_preview_links: true
display_url: https://yoursite.netlify.app
Wherever you see yoursite change to the name of your site created on Netlify.
Also on line 3 change the repo path. This will be the GitHub username followed by your repository name.
Site configuration
Open _config.yml in a text editor to change some settings.
Change these variables in _config.yml:
url: "https://yoursite.netlify.app"   #change this to yours
repository: yourusername/yourrepository
title: Your recipe collection
recipemenu: false # you can change to true and a menu of all recipes will appear
editbutton: false # you can navigate to edit your site by going to https://yoursite.netlify.app/admin
# change the above to true and an admin button will appear in your footer
searchbutton: false # you can have a search feature by adding this button to the footer
# change the above to true and a search button will appear in your footer
Usage
Jekyll is a system for building and editing static web sites; meaning that it does not need a database for the content. Content can be added with a simple text language called Markdown. You can explore and learn Markdown here:
https://commonmark.org/help/tutorial/
Although the main content is built with markdown and converted to HTML automatically, you won't need to actually write in markdown, unless you want to. The site is set up to use a content management system (CMS) so that posting new content and setting up the site can be done through a web interface.
Using the CMS to edit your site
Once these changes have been made in Github, you can now go to your new site and begin to add some further details through the CMS. You may need to wait for 5 minutes.
Your site will be live but there will be no styling; your task is to edit the CSS, and add your recipes and introduction text.
HTML and CSS
right now your site doesn't have any styling at all so we need to take a copy of one of your recipes and go through a number of exercises to edit the stylesheet.
Find the program call SiteSucker (you can download a copy from moodle)
Paste in the URL box your live web site. This will be something like myrecipes.netlify.app
Press return.
Your complete web site will be saved in the downloads folder under the name us.sitesucker.mac.sitesucker. In that folder will be your site named as the url of your site. Move this folder out of the downloads folder and into your project space for your work (maybe in a Google Drive folder)