Making an eBook of Recipes
A Tutorial
The objective here is to create a reflowable ePub from InDesign. The intent is just to make en eBook, with no intent to create a print version.
From text and pictures, we are going to create an InDesign document, export for ePub3 (reflowable) and then 'break open' the ePub file, check out the CSS and then make our own stylesheet to go into the ePub package.
What you need
You will need to be using Photoshop to build the cover image and edit the pictures and add the metadata.
You will need to be using InDesign Creative Cloud. The screen grabs in this document are created from InDesign version 12.
You will need to be able to review the contents the ePub package after export from InDesign and I suggest Atom. In order to edit the ePub package, you will need to ‘unpack’ the file and then re-pack; for this we need a script
Prepare
Create a folder somewhere for the eBook work and then create two folders inside that - one for images and one for text.
Your Text
I am working on a selection of recipes on the theme of ‘Greek Islands’. I have collected my recipes together, but I need to keep the originals somewhere and even consider how these recipes should be displayed.
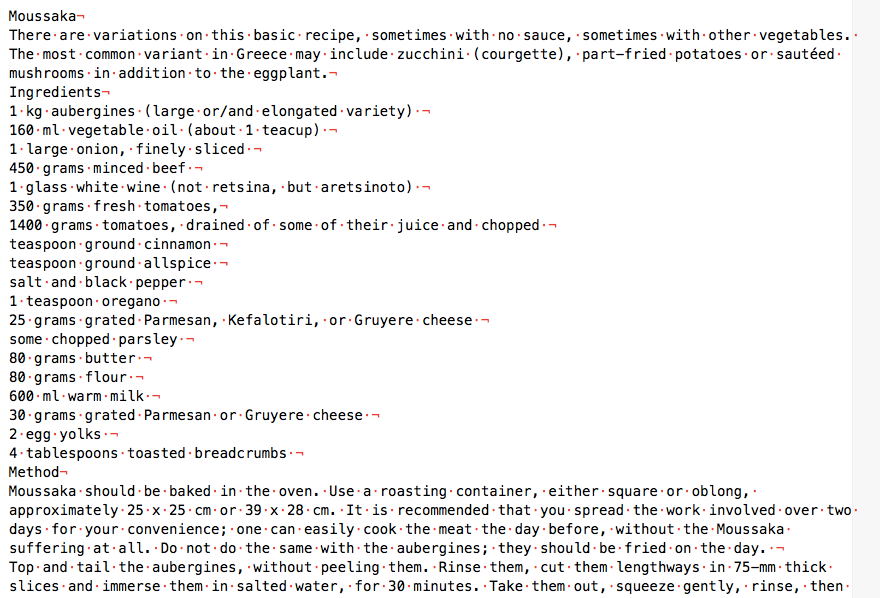
In this image of the first recipe I have switched on the invisible characters; you will notice spaces and line breaks. Analysis of the layout of this recipe indicates the following pattern.
The Moussaka Recipe has has a title, introduction, list of ingredients (with quantities) and a method section.
As an editor, I need to collect my recipes together and try to build a consistent structure for all of them, with these same elements.
You can optionally prepare the text in a word processor and use the styles to create your basic layout. I prefer to leave this aspect until the text is placed in InDesign.
You will need to work on one recipe first, keeping this as a separate InDesign document.
Illustrations
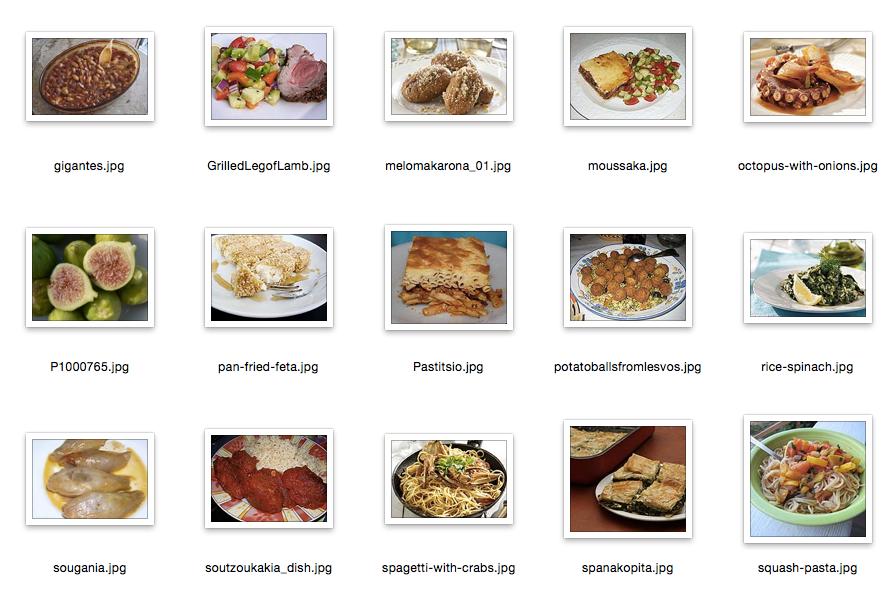
You will want to illustrate your recipes, so you need to gather these in your images folder described above.
You will want to make some adjustments to these images using Photoshop perhaps. The images should be large enough to display in good quality within the eBook. They should be no smaller than 1000pixels wide in 72 PPI. InDesign will create the appropriate format for the eBook later, but, for now you are gathering your assets (text and images) and considering the structure of your eBook and how the recipes should display.
Start InDesign
You may want to configure your copy of InDesign to your liking. I prefer to have the units set up as pixels and the display performance to be set at 'High Quality'. I also prefer the pages panel to show medium sized thumbnails.
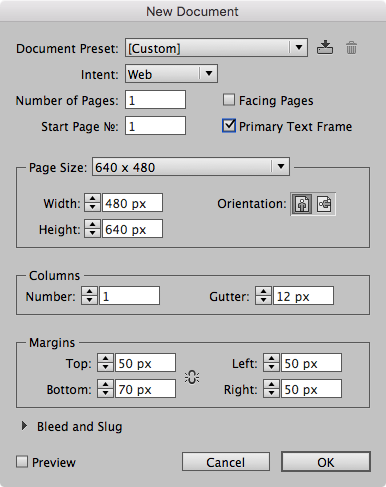
Start a new document with File>New. Now for this work we are going to create one document so we choose >Document NOT >Book.
The dialogue that appears will ask for things like size. Much of this does not matter for the ebook, because the size will be automatically determined by the device. However, we do need to turn off 'Facing Pages' (at least, this is what I prefer!) and we should make sure that this is vertical (portrait) format. The number of pages is not relevant at this stage. If you choose ‘Web’ for the Intent, then you can choose a dimension of 480x640 pixels and this will give you a reasonable visual clue to the final proportions and scale of the eBook.
I have set the margins to be 50px top and 70px bottom, and 50px left and right. This will simulate the margins of iBooks on the iPad.
Before we place any text we need to make some further preparations to the InDesign document.
Colours
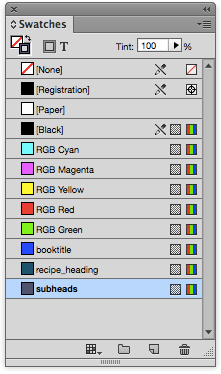
You may want to use colours in your ebook - maybe for the headings or to give emphasis here and there. You should really create the swatches for the colours that you might need. Perhaps you could take colour ideas from the cover that you already created.
Styles
We can build the styles as we go, but it will be worth analysing your text resource to think about how you might want different styles. You should create a paragraph style (call it bodytext), and make this the default style on which all others are based.
- The body text
- The title of the book
- The headings (one for the recipe and one for the sections like the Ingredients).
- A variety of paragraph styles for the lines of ingredients; the method paragraphs and the introduction.
- We will also need a character style for the quantity within in the ingredient.
Save the (as yet) empty InDesign document in the folder prepared above. Get into the habit of NOT including spaces in file names.
Place the text
Now we are ready to place the text from one recipe text document.
The Place menu item under File will allow you to select the word document but please be sure to have the 'Show Import Options' checked. You should then see a number of choices with regard to the text document. My example shows that raw unformatted text needs to be imported with the UTF8 character set. This is in case you are using any special characters like quotes or accented characters.
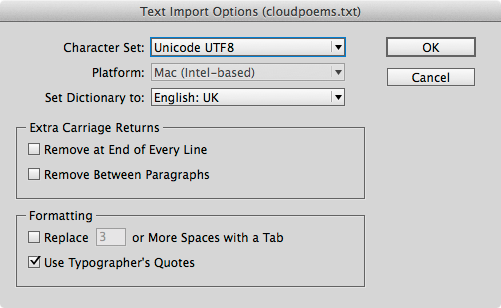
If you are placing text from Word then you can remove the styles the and the table of contents and footnotes etc. Once you hit OK, the cursor will change to show that you have loaded the text into the memory ready for placing. Go to the top left of your one page in InDesign and with the SHIFT key depressed the cursor will change to show that the pages will be added automatically.
You should now have a several pages of (rather dull looking) text.
Show the hidden characters
It is important to let InDesign show you the characters that do not print. You can view these by going to the Type menu and then at the very bottom select ‘Show Hidden Characters.
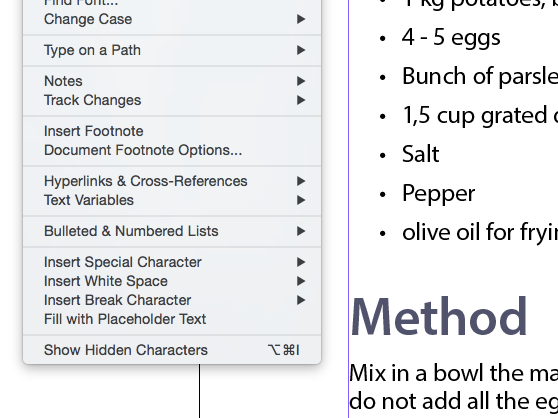
You want to be able to see spaces and paragraph breaks, because you need to replace those with the spacing rules in the paragraph styles.
Let’s get styling
Using the text tool select all of the text and with the paragraph styles showing select the bodytext style created above. Everything will begin to look better. Now with nothing selected make your adjustments to the style as you see fit.
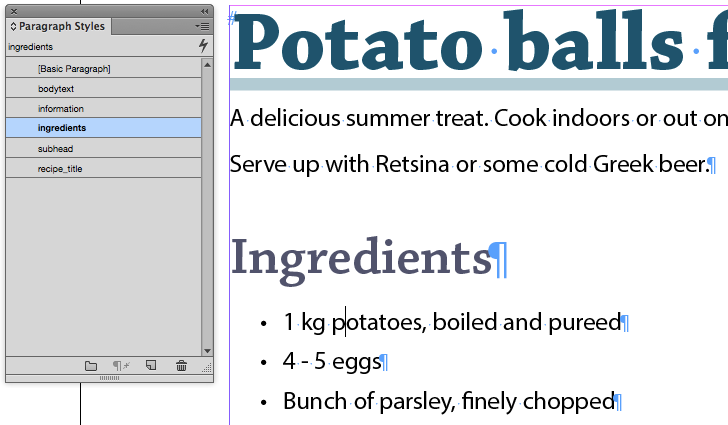
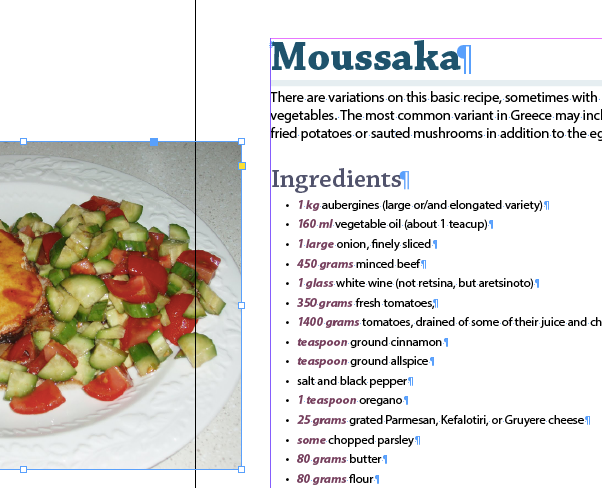
Put your text cursor in the recipe name line and select the ‘recipe_title' style. Adjust the style to your liking. Same with the headings for each of the recipe sections and the ingredient list items.
You can see here that I have now created a style for the recipe name and also for the section heading. In the image above, you will see that the ingredients are bulleted.
Character Styles for Ingredient Quantities
In my example I want the quantity to have a slightly different appearance within the line for the ingredient. For this we need a character style.
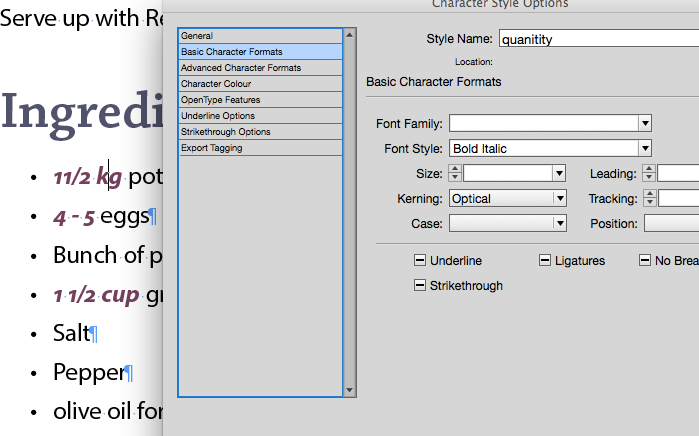
The character styles are only for those parts of the text inside the paragraph. Initially, these quantities will have the style set by the paragraph style: ingredients. With our character style, we will add a font style and a colour.
Fractions
You will notice now that fractions are not displaying properly. Something like 11/2 should be 1½.
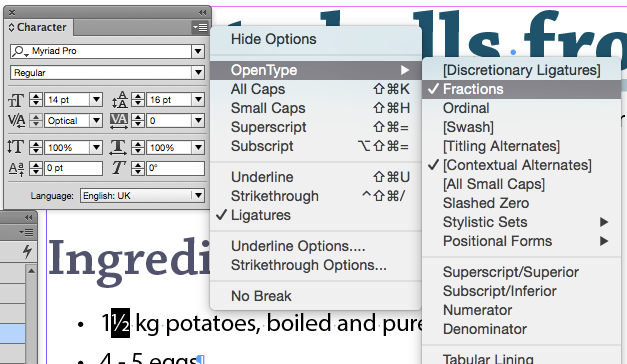
There are several solutions to this problem, but because we have a particular character style already, we cannot use a character style for the fractions. Presuming that we are using an opentype font, we can select Fractions from the Opentype menu under the character style panel.
Styles for the headings
You will notice in the example here that the name of the recipe in each case begins on a new page. This is because I have selected ‘On the Next page’ under the keep options for this style rule.
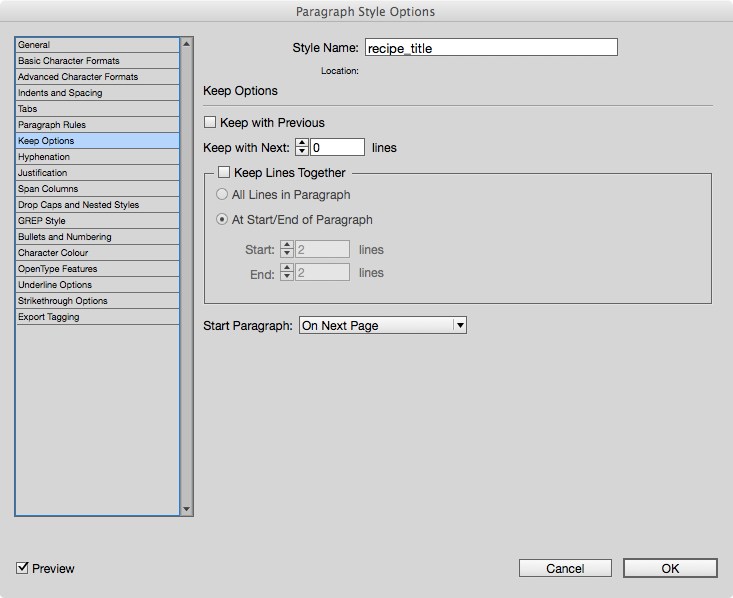
This forces this heading style to move to the top of the next page.This is an important concept in InDesign, and we would normally use this feature for printable documents. Because we are providing a separate InDesign document for each recipe, we don't need to worry about this, since the book panel (see later), will always start an InDesign document on a new page (print or eBook).
How does a typical Recipe Look in print?
Here is scanned page from an existing printed recipe book.
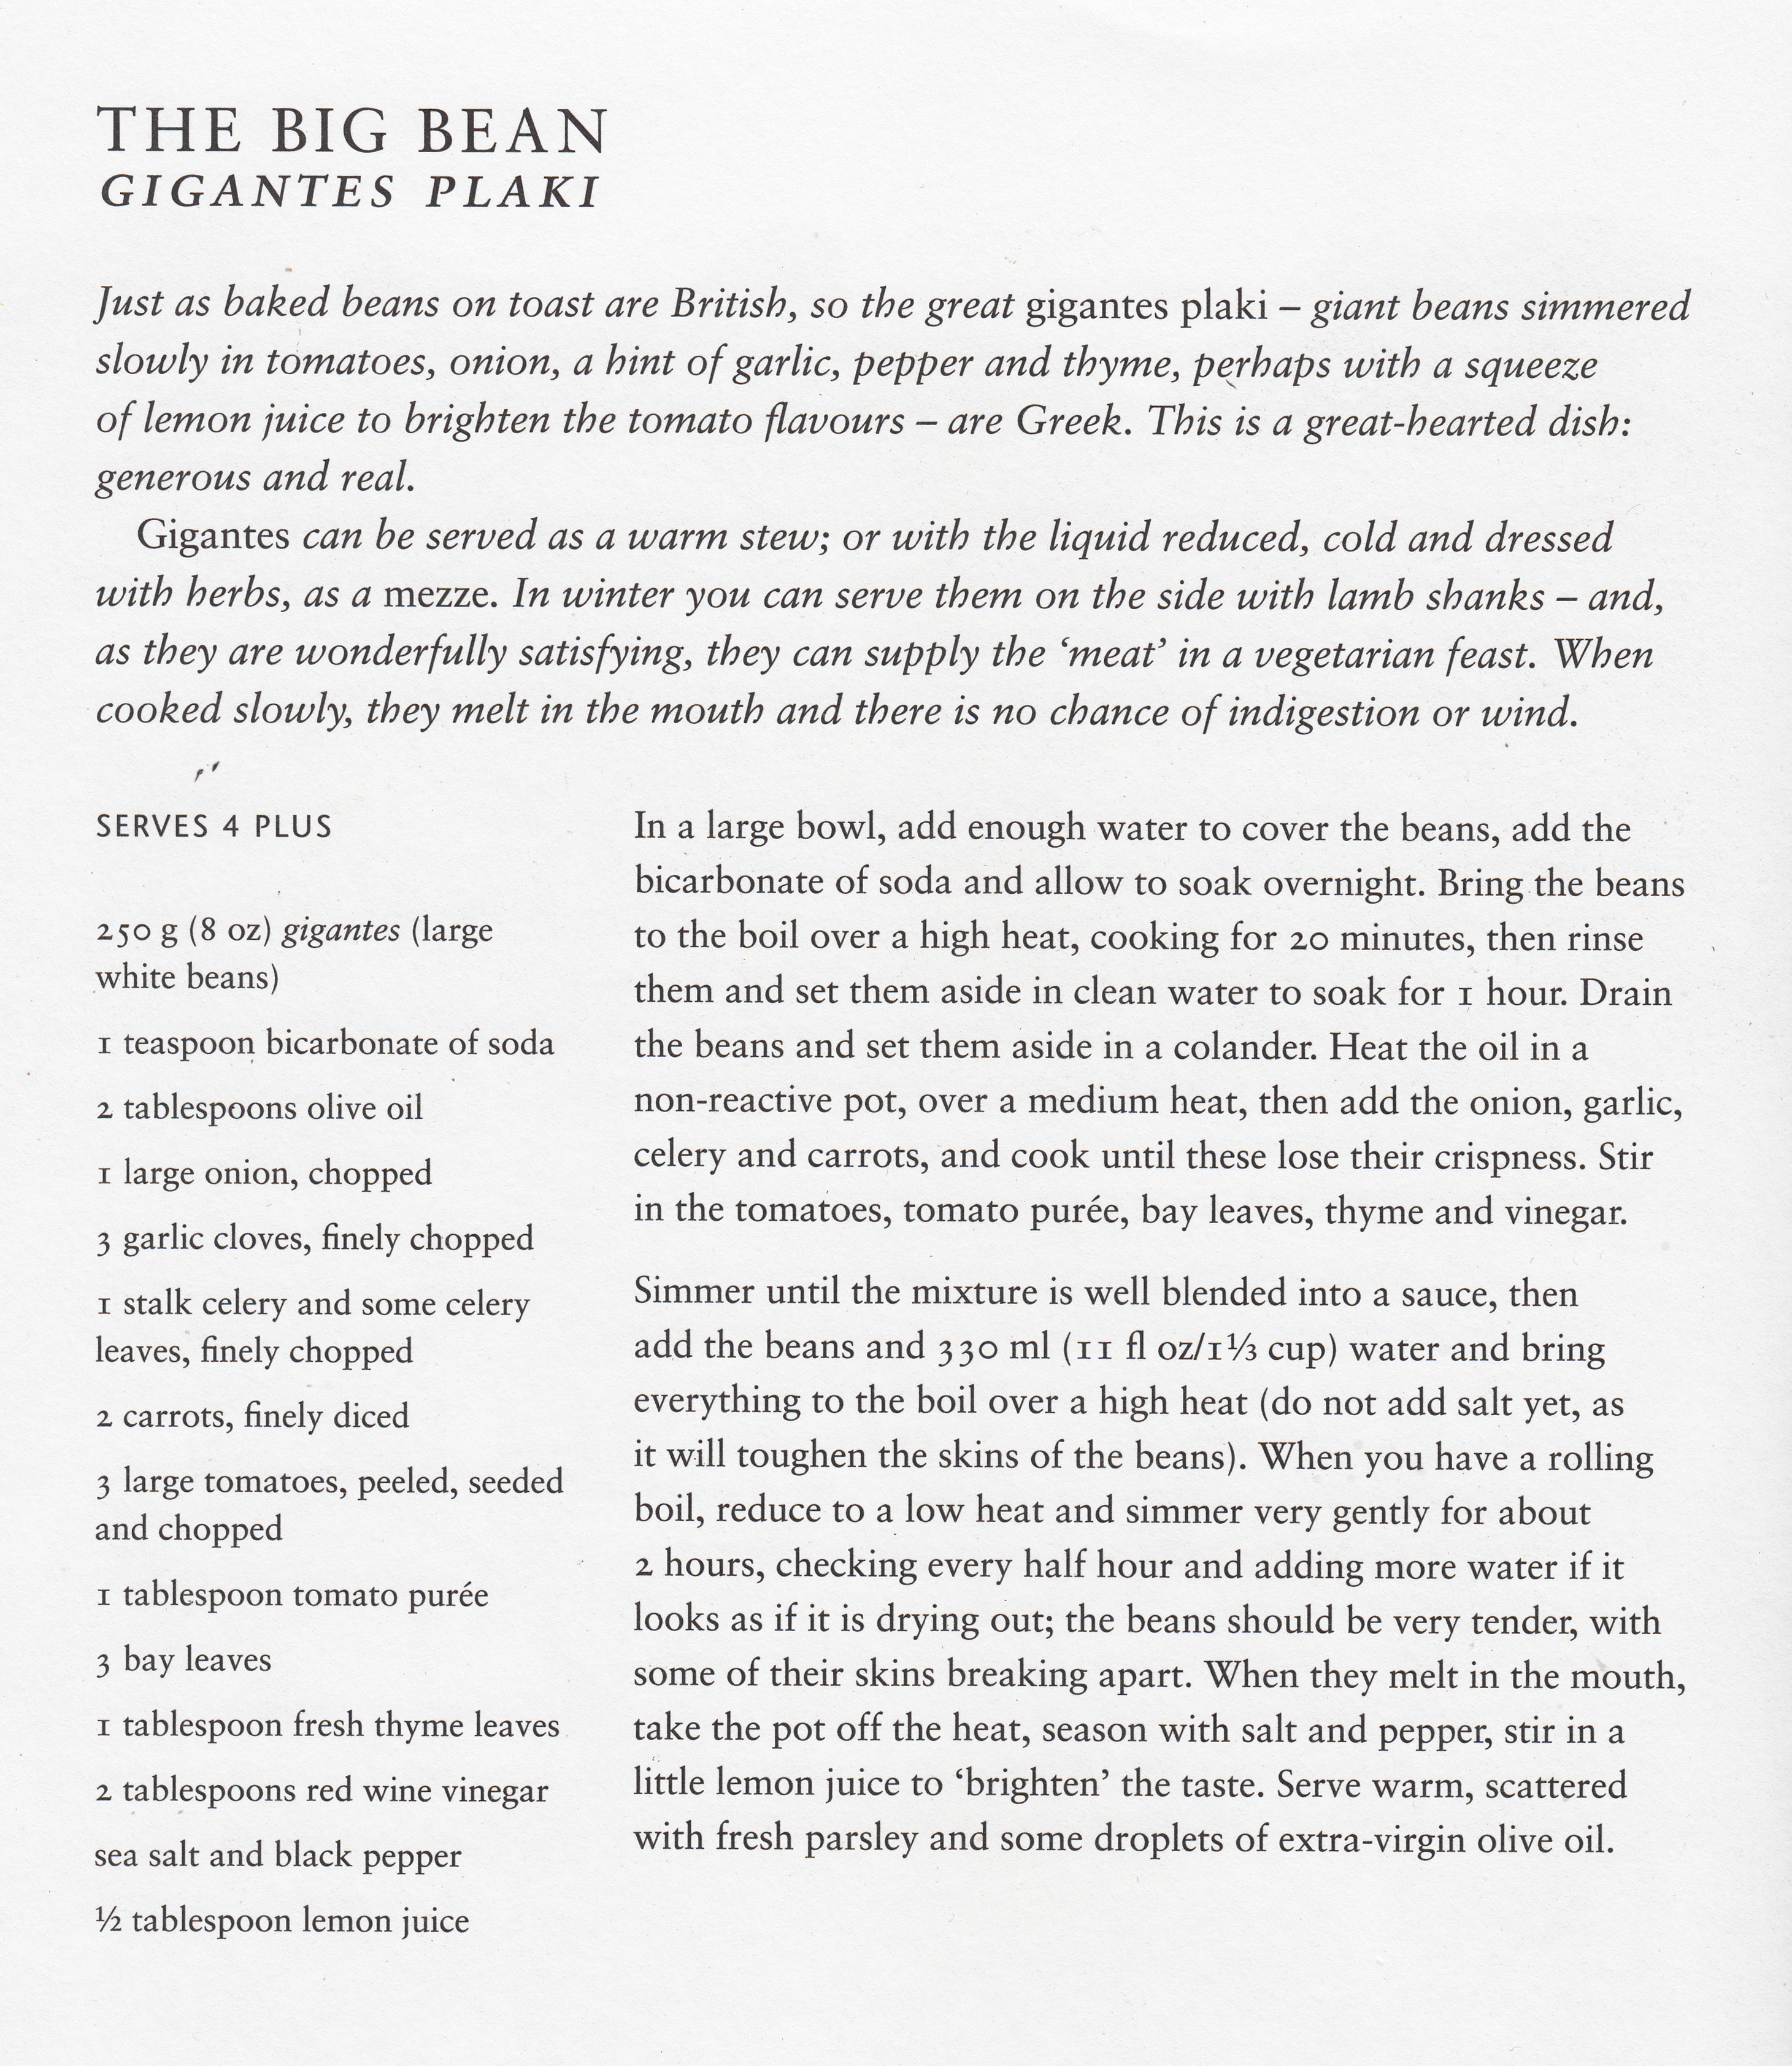
As you can see the content is arranged with an introduction that spans the page —then 2 columns for the ingredients and the the method.
We are not intending to copy the layout of this book, but it is worth understanding the limitations of the reflowable eBook format.
In a reflowable eBook, we cannot use columns, so we will need to separate these text items into flowing text. In the publishing world, you might be required to take content that has been designed for print; the InDesign may have been created for a print edition. You will need to know how to make changes to the InDesign file to get the best eBook.
Using images
You can think about how you might use images in the eBook. Perhaps, one for each of the recipes? When you create an introduction and a title page, those can also include an image. Images will need to be anchored in the text, so that when the text flows (when the reader has increased the font size), the image stays with the correct text. Images that are not anchored will simply appear at the end of the book.
The images folder should contain an image for each of the recipes as well as one for the introduction (not written yet) and the ebook cover.
The important thing to remember, is that this process is more about the flow of the document rather than the appearance, so we cannot just place the images anywhere and expect them to appear in the right place within the text. The images need to be 'anchored' correctly.
Place the Image on the Pasteboard first
In my eBook I plan to put a different food image with each recipe. I intend to place this image below the recipe introduction and before the start of the ingredients.
The screen picture here shows the image on the pasteboard. Notice the small blue square on the border of the image. We need to drag this to the end of the last line in the introduction. This will anchor it at this point in the text and you should notice an ‘anchor’ symbol in place of the small blue square.
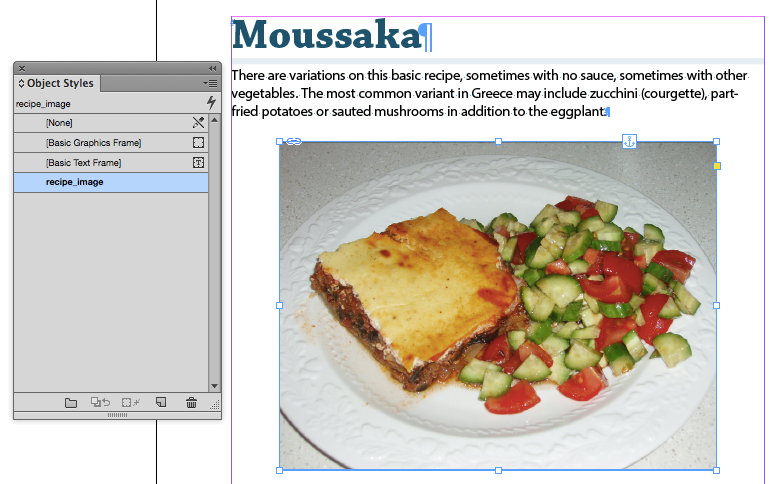
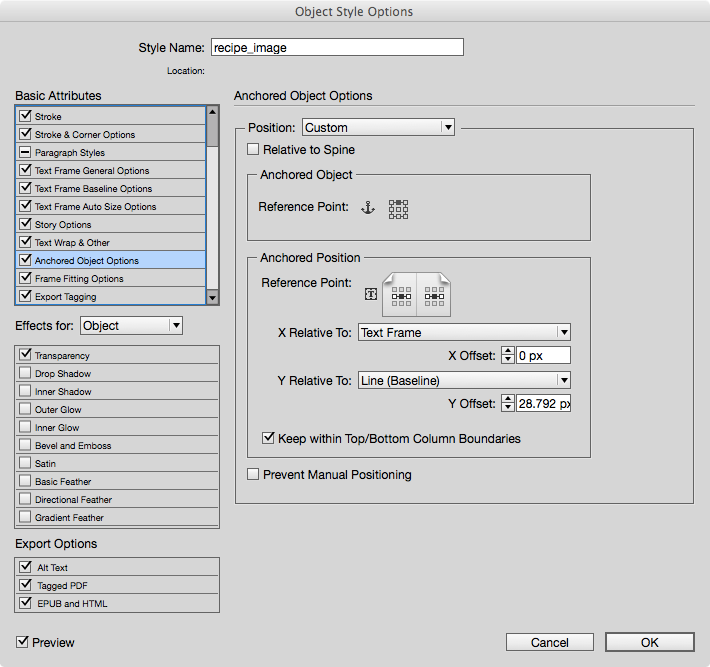
Now we need to create an Object Style for all images that will follow the recipe introduction.
Object Styles
Object styles are a very powerful feature of InDesign, and allow you to apply formatting to various attributes of the object. They also allow you to control how the HTML is generated for the ePub when it is exported; more on this later.
With the anchored image selected, find the Object panel, and create a new object style. I will name mine ‘recipe_image’.
This image shows the object style palette, with the focus on the ‘Anchored Object Options’
Saving this one recipe and Duplicating
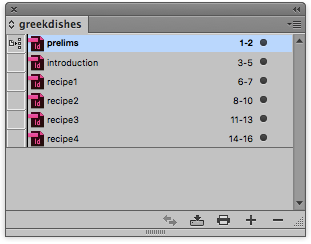
Once you have all of the styles as you want for one recipe you will now need create new recipes by duplicating this one and replacing the content with the next recipe. You will need to do this for each recipe. You will also need a separate InDesign file for the prelims, the introduction and also for the colophon page.
Save these individual files with logical names like recipe1, recipe2 etc. Now we need to combine in the book.
The Book Panel
With InDesign go to >File>New>Book
We need to make sure that we can synchronise the page numbering and that all of the separate files use the same styles throughout. Only one file can be the style source and this is also where we build the table of contents.
You will need to set the numbering options for each file to start automatically; thus following from the previous.
The Table of Contents
InDesign will help us to create an interactive table of contents based on the headings we have used in the text. In my example, I will use the name of the recipe as the top level headings and then the sub headings below this.
The table of contents is one of the last tasks in our eBook project. The TOC needs to include all elements in the book, so we will need the Introduction and the Colophon page before we do this.
The Table of Contents panel is available from the layout menu. So, go to first page of the book and from the menu select Layout>Table of Contents .. and then in that dialogue box open 'More Options'. From the styles pane you need to select each of the main styles.
I have selected each heading style in turn and added this to the left hand panel. Use the entry style shown ‘TOC Body text’ - not the same style!
Notice that I have saved this TOC as ‘erecipes’. It is possible to have different TOC styles and structures within the same book; one for the recipes, one for the illustrations etc.
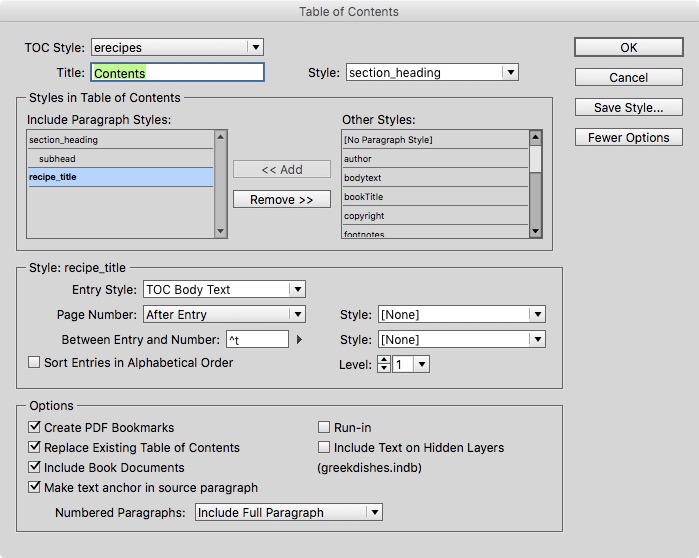
In my example, I place this TOC on the pasteboard rather than on the page. In my eBook I will only use the TOC in the user interface of the eReader (iBooks on my iPad).
The Cover Image
There are several ways we can create a cover image:
We can build the image on a new blank page at the beginning of the book in InDesign
We can use text and images in InDesign, on this page and group then together to form the cover.
We can simply create the cover in Photoshop and then select this image during the export to ePub process.
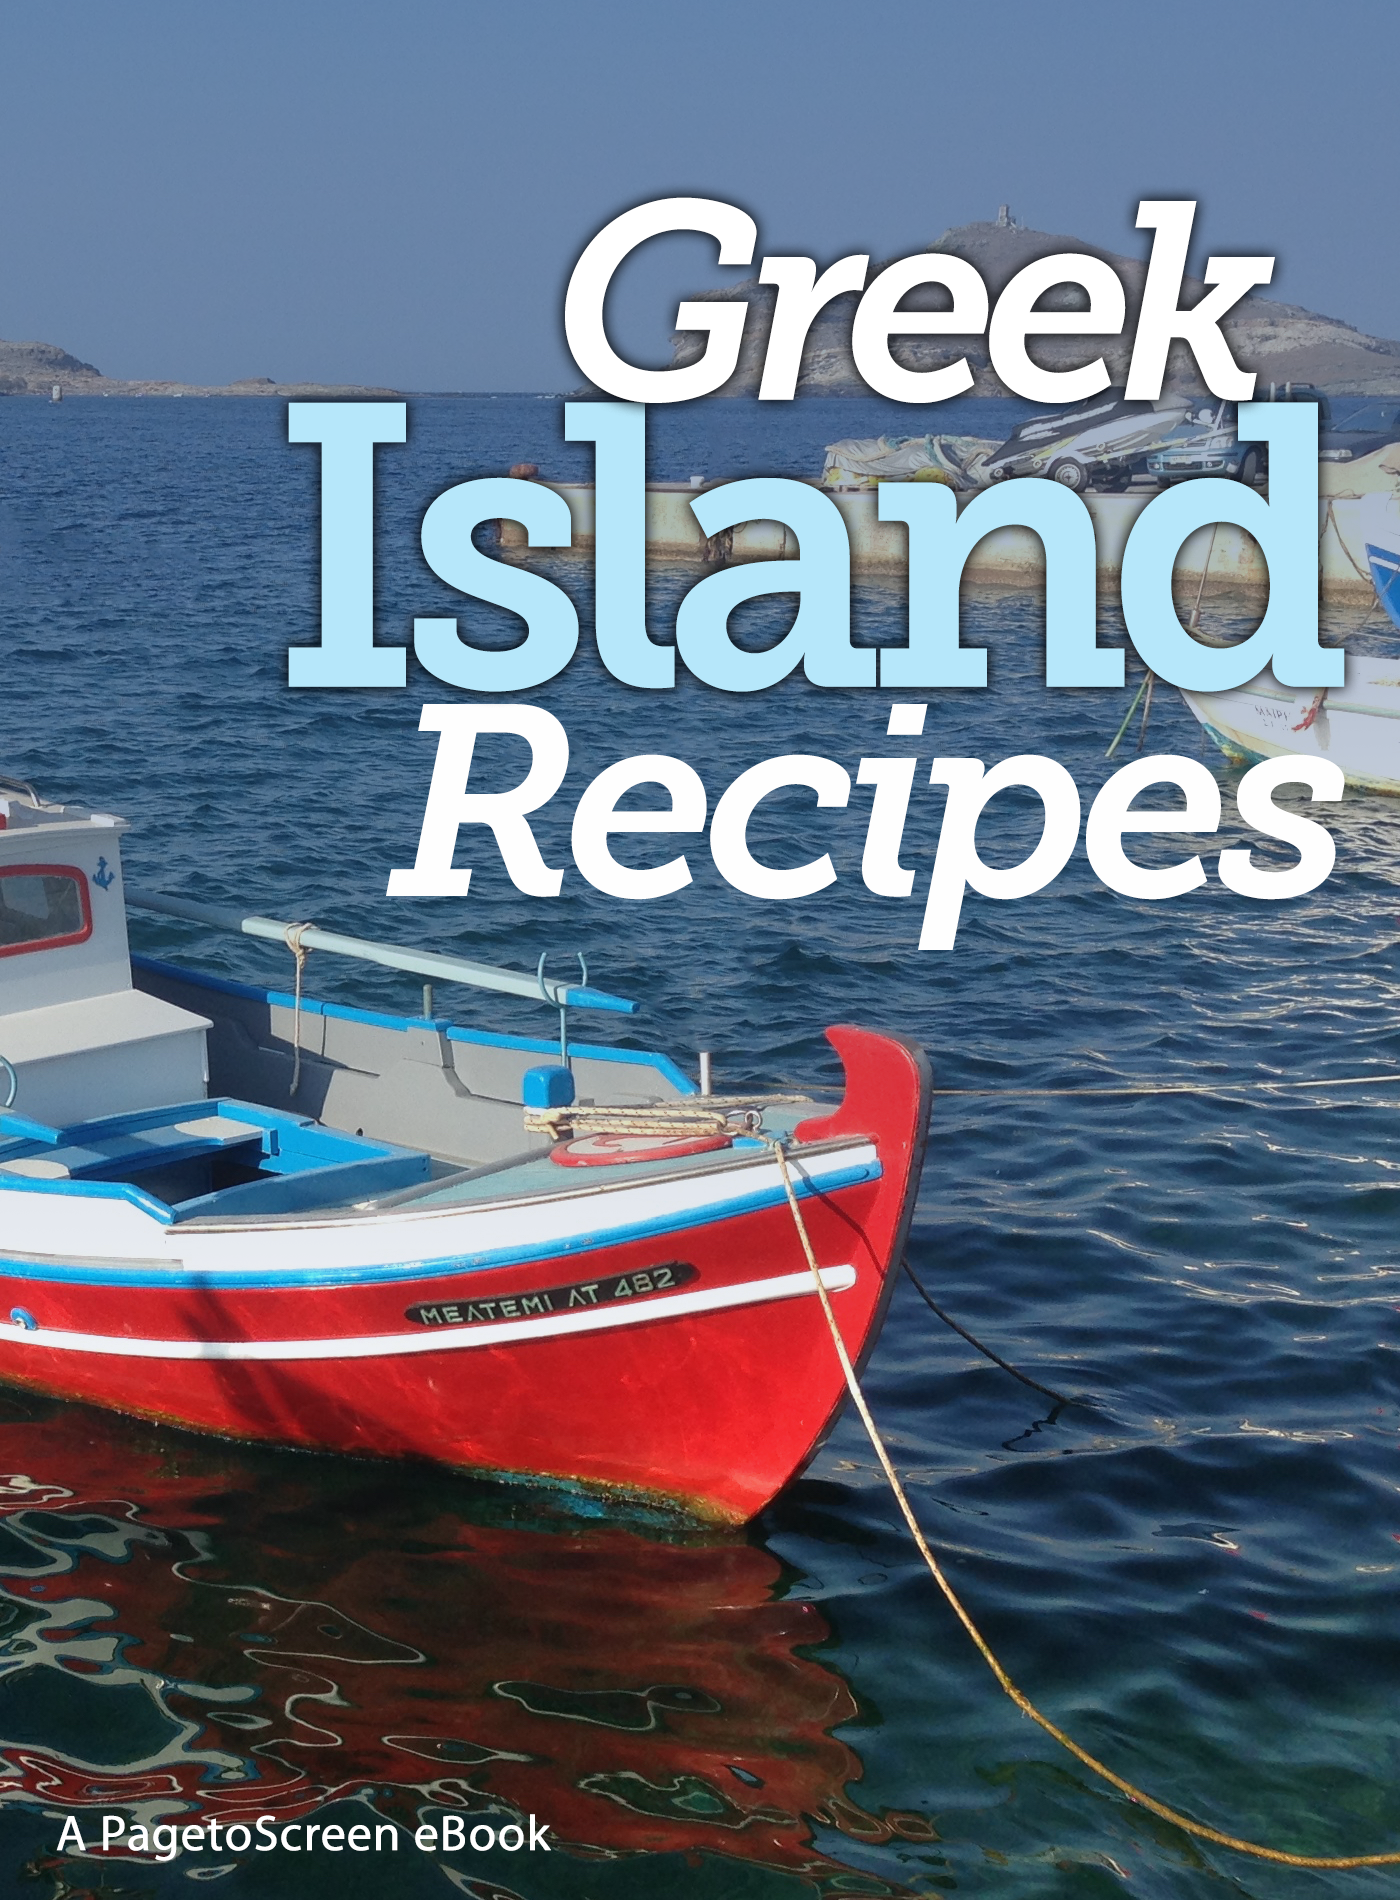
For my ‘Greek Island Recipes’ eBook I have created the cover in Photoshop and saved ready to be used when we export to ePub from InDesign. Keep your Photoshop file, but you need to save as a JPEG for use in the cover (chosen when we export to ePub).
The cover image is a special image and we have certain issues to consider.
Remember, this image will be seen as a thumbnail image within the eBook delivery system, so make it clear enough to be read at small sizes. Do not use text that is too small or against a complex background.
This eBook will be a portrait format eBook and so the cover should be in the proportion of 6x8.
Even if the cover is reduced in size for the eBook, keep a larger version available for marketing purposes. If you are delivering through the Apple iBookstore, they require an image with the short side being 1400 pixels!
Prepare the Styles for Export
InDesign will take the various elements in the document (paragraphs, characters and objects) and convert them to the appropriate HTML markup in the documents in the ePub file. We can control the way this markup happens by specifying the HTML for each style.
Chunking the eBook
The ePub package consists of a number of HTML documents, and for our example we want one separate HTML file for each of our recipes.
We have already simulated this in InDesign, by using the book panel to separate our chapters or recipes. When we use the book panel with separate InDesign documents for each recipe, we do not need to ‘split’ the eBook by the recipe title, however, if your design involves devoting a whole page to the recipe title (perhaps with a picture), then we will need to further split the ePub on export.

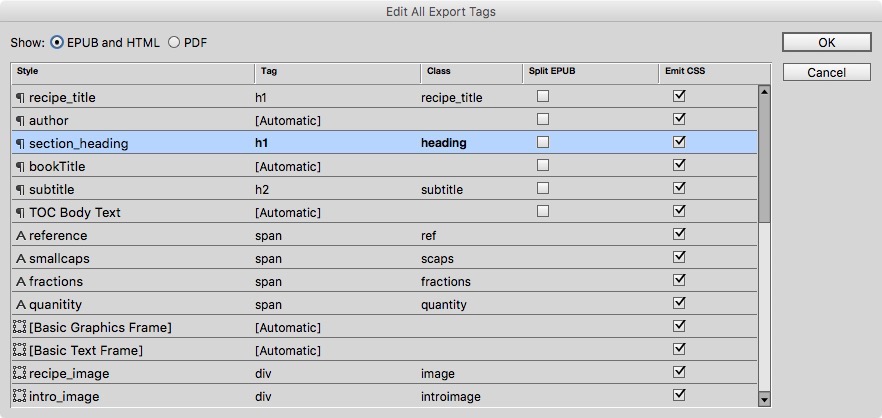
The ‘Export tagging’ panel is where we set up the HTML tags for each of the paragraph and character styles. You will notice that I have selected the <h1> tag with a class name of ‘recipe_title’.

It is also possible to configure these settings for all of the paragraph and character styles in one place. In the paragraph context menu find ‘Edit All Export Tags…”
As you can see here, we have given all of the recipe titles an <h1> tag and added our own class names that identify their meaning in the structure of our book of recipes.
Getting Our Pages and objects in the correct order
Before we export to the reflowable ePub, we need to be sure that all of our content will flow in the correct order. This is where we might get some nasty surprises.
Threaded Text
If all of your text is threaded together (see this image below), then the reflowable ePub that is created will be in this exact same order.
If you have some text boxes that are not threaded, then you have a choice; you can link together the text frames by dragging the out-port to the in-port of the following frame.
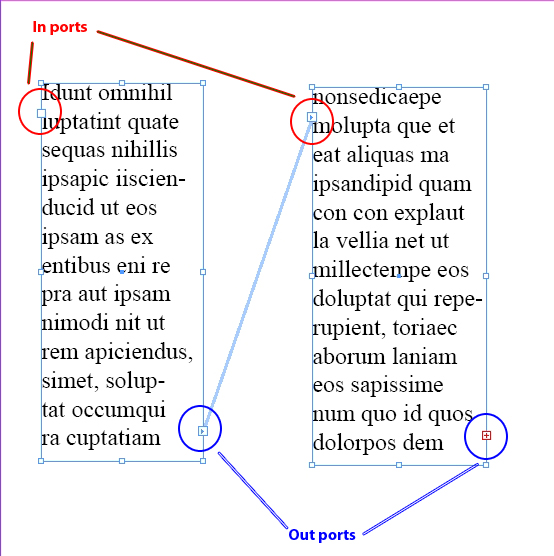
If you don’t see the thread lines indicating that the text frames are threaded then go to the Extras menu under View.
Using Articles to Order the Content
An alternative way to get the ePub to flow the content in the correct order is to use the Articles panel and add the items in the correct order in that panel. When we export to ePub, we can then choose this method of ordering. The Articles panel is found under the Window menu. You will need to use the articles panel for each InDesign file.
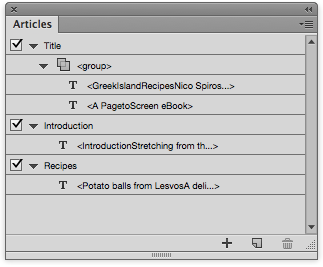
You will see in a moment how we use this order in the Export to ePub (reflowable) settings.
The Title Page
In a book ready for print, it is an accepted arrangement to have a half-title, blank page and then the full title page. This page would normally include the title, the author and the publisher. In an eBook, we don’t need a half title, but we do need the full title page. The typography of this cover can reflect the design of the cover itself, and we will create this within InDesign. We will want to configure this page so that it becomes a graphic in the ePub.

The text and (possible) images on this title page, needs to be in one text frame, or combined into one group. With these selected, you can now select ‘Object Export Options’.
From this panel we can rasterise the container. This turns the object into an image.
We can set the ePub:type for this page as well as the format for the graphic.
The Alt Text
Alt text is needed for all graphics in our ePub. This should describe the image for accessibility reasons. You can add the text in the panel.
Export to ePub
In the book panel menu find Export > ePub (Reflowable). The dialogue has several sections and you need to pay attention to each of these in turn.
The General Section
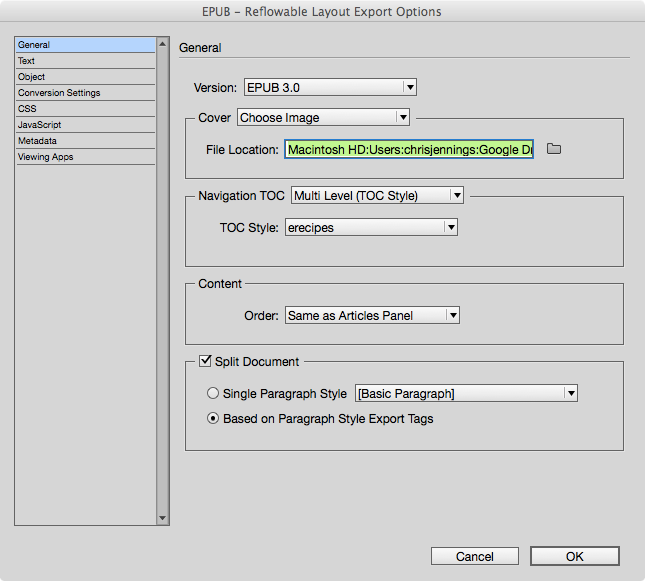
Select ePUB3.0; we are using the most recent version of the ePub standard.
The cover will be selected from the graphic made earlier.
Choose the TOC style from the one we made on the pasteboard of InDesign.
Select Content Order - Same as Articles Panel. If all of our text is was in one ‘story’ then we could use Based on Page Layout but all text frames must be threaded together for this option to work properly.
Check the ‘Split Document Based on Paragraph Style Tags’
The Text Section
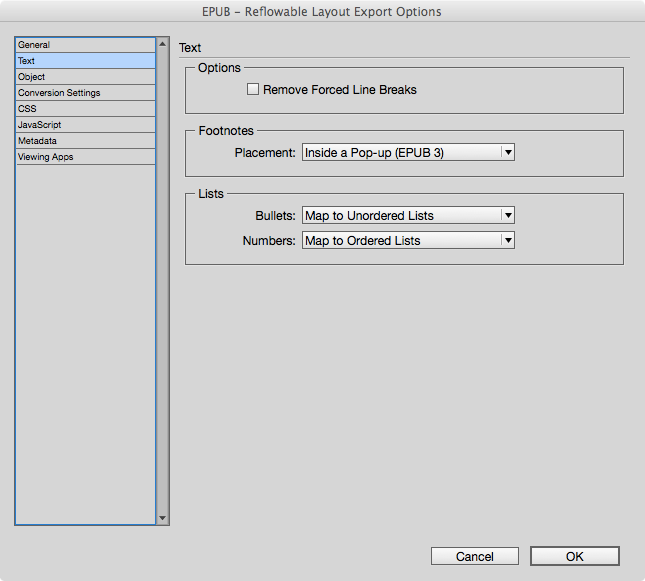
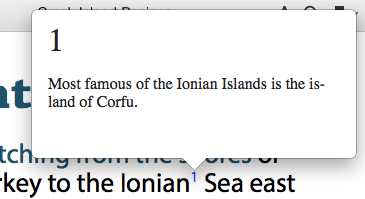
There is little for us to configure here, however, if we have used footnotes, then we can convert these to popup notes. There will be supported in Apples iBooks on Mac or iOS. We should also be sure to make our bulleted lists convert to the proper HTML list types.
The Object Section
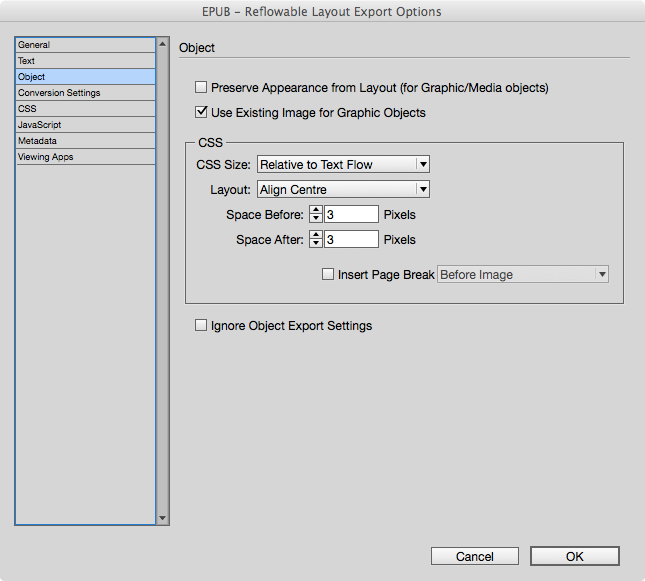
There are various choices that we have in the settings for the objects. This generally means the images used in our recipe book, but it might also effect other anchored objects.
If we make modifications to the way images are displayed within InDesign (shadows, stroke, rounded corners etc., then we can tick on ‘Preserve Appearance from ….’. Leave this off if you want those features ignored for the eBook.
With ‘Use Existing Image …..’ unchecked, the images will be reduced in size to dimensions that reflect how they are seen on the InDesign page. There is a distinct disadvantage with this setting, because iBooks can potentially enlarge the images on double-tap; if the image is small, then there will be no significant ‘zoom’ up. If you check on ‘Use Existing Image for Graphic Objects’, then (if the images are larger than their display on the InDesign page, then they will zoom up. A good size to aim for is 1000 pixels on the short side.
CSS (the style rules for HTML) will be created for the images sizes. I suggest that you select ‘Relative to Text Flow’, because the images will resize automatically to fit the page size (portrait, landscape, device size etc.).
Conversion Settings
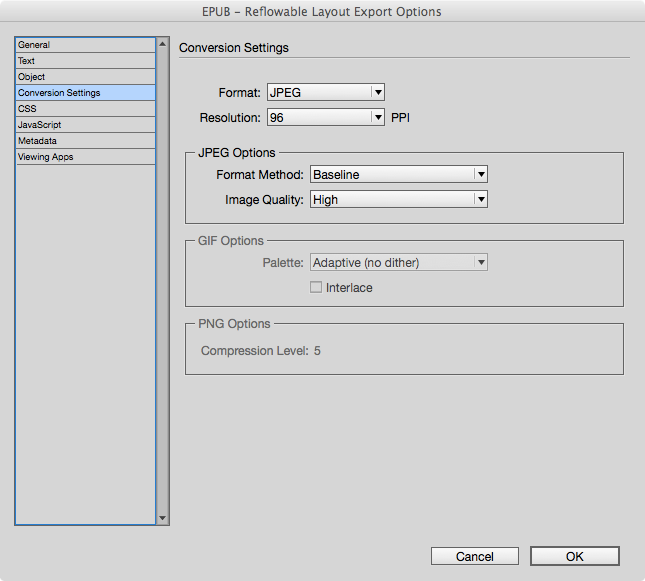
You can choose from automatic or different graphic formats. JPEG seems the most appropriate and is supported on more platforms. There may be some some when you want images to be exported as PNG files so that the transparency is respected.
If we have used some specific settings in the ‘Object Export Settings’ for particular objects then those settings are respected as long as we do not check on the ‘Ignore Object Export Settings’ under the Object Settings panel (see above).
The CSS Settings Panel
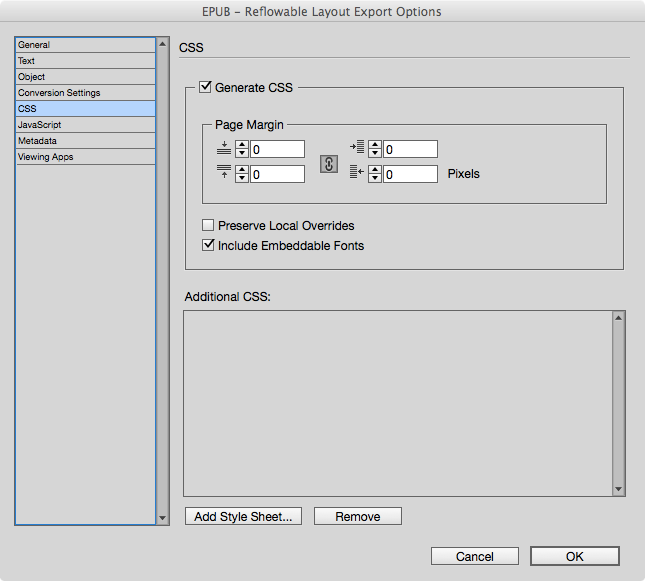
When we export to the ePub format, InDesign will try to create equivalent CSS rules for all of the paragraph, character and object styles. We should have given tags to all of the element types within InDesign, and this will then provide the correct tags in the XHTML files. We can also set page margins in this panel, although this is not really useful for most devices, since they provide their own margins.
We can say a lot about embedding fonts, and this needs to be exported fully elsewhere, but with this checkbox on InDesign will take the fonts used and provide obfuscated versions inside the ePub.
Later, we will explore the idea of adding a CSS file of our own into the ePub package. We do not intend to add javascript into this ePub, so we can ignore the next settings panel.
Metadata
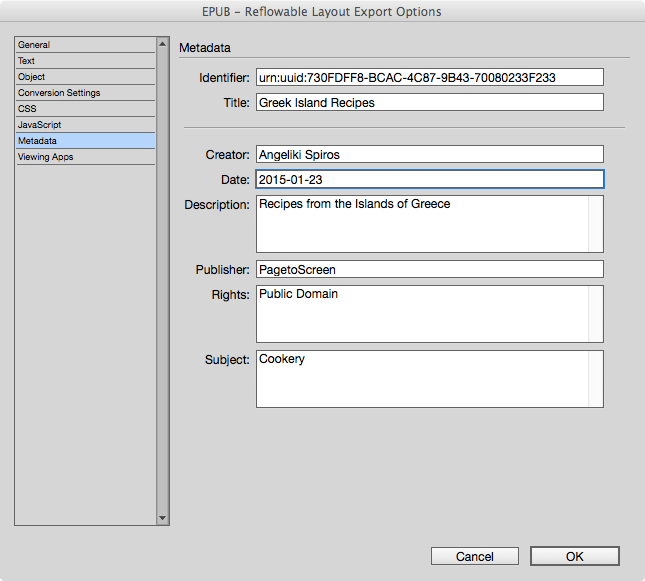
We will have already added some metadata to the InDesign file, and this will populate some parts of this panel. However, we can add ISBN, date, publisher, copyrights and subject into this panel.
Most of these entry fields are self explanatory but the date field will need a special format.
The date must be in the form shown: Year-Month-Day, in numerals like this:
2015-01-23
You have an ePUB; How does it look?
The viewing APPs settings panel allows you to add ePub readers, so that the eBook will open automatically. You could use Apple iBooks, or Adobe Digital Editions.
Cracking open the ePUB file
An ePUB file is actually a ZIP file that has been renamed with the .epub extension, so to make changes internally we need to unpack the file to see the individual files.
How you ‘unzip’ the file will depend on whether you are using a MAC or a PC, however, for the purposes of this example, we will uses a clever script called ‘~~ePub Zip Unzip~~’ for the MAC. This Applescript will take the ePub and break it open into a single folder. Once editing is complete the same script will package up the files correctly to the ePub file.
Attention
You should now use the preferred software eCanCrusher](https://www.docdataflow.com/ecancrusher/)
What to to Edit?
Once we unpack the ePub file we will see something like this:
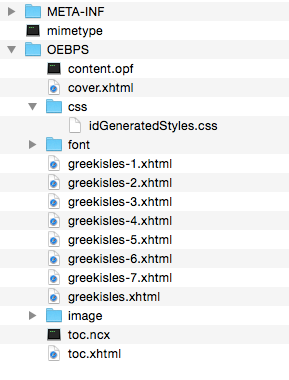
Each of the recipes has an (x)HTML file and the style is defined in a CSS file located inside the CSS folder.
How can we Edit the CSS?
We can edit the CSS file with an basic text editor such as Atom on the MAC or Notepad++ on the PC. However, if you have access to Adobe Dreamweaver, then this will be useful, because you can see (approximately) how the style of a page changes when you edit the CSS.
In the following example, we are changing the CSS and then observing the change directly in the Dreamweaver preview window. We can also view the page in a web browser like Safari or Google Chrome.
Own the Styles.
When we have edited the CSS to our liking, then we need to make a copy of it. Go ahead and select-all, and copy paste to a new blank CSS document in Dreamweaver, and then save it somewhere with a logical name ( called mine ‘recipes.css’). We will need this file.
Attention to Detail
We need to check thoroughly the outcome of our changes and there are some elements to the styles in InDesign that do not have the equivalent styles in the ePub version. The software engineers at Adobe have made changes for each new version of Indesign and there is one particular bug that we need to be aware of.
Here are some things that we need to fix.
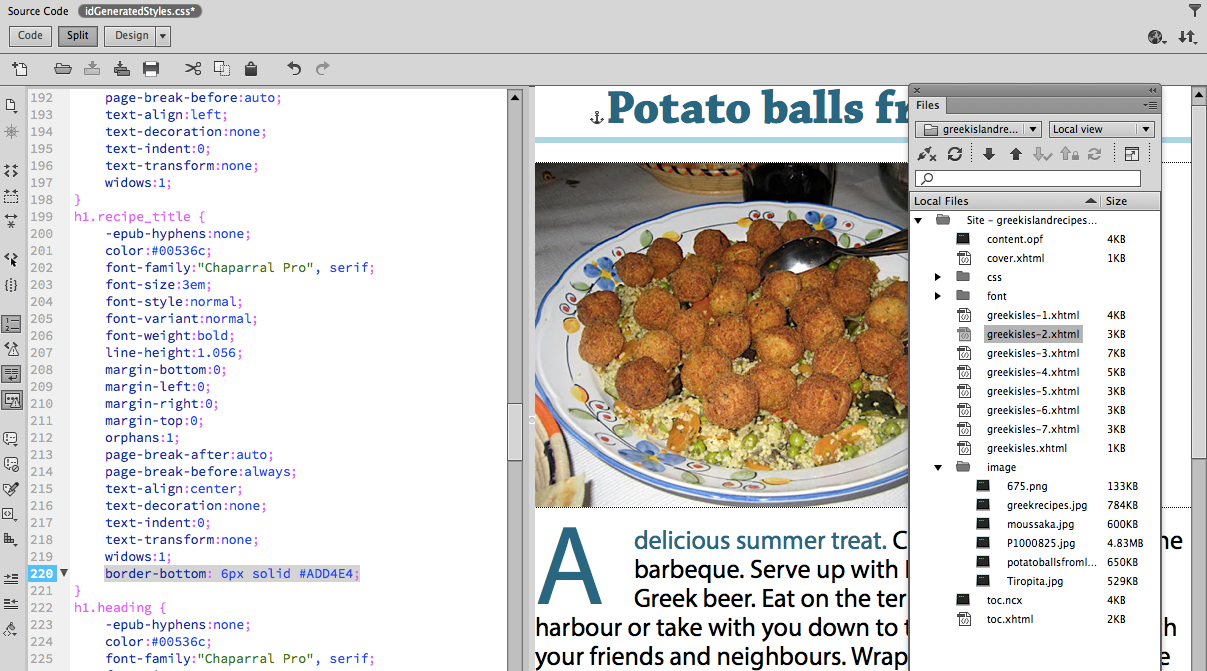
Borders or Rules
We have applied a rule underneath our heading styles for both the Introduction heading and the recipe title. This needs adding in the CSS. You can see this happening in the Dreamweaver screen shot on the previous page. In the CSS for the 2 style rules we need to add:
border-bottom: 6px solid #ADD4E4;
Fractions
Indesign helped us add fractions such as ½ with the OpenType features. Unfortunately, this will not result in the proper way for this to be displayed in HTML and CSS. So, we need to replace 1/2 in the HTML with the entity code for this glyph in HTML.
Here are some common fractions with their HTML entities.
½
½⅓
⅓⅔
⅔¼
¼¾
¾
Back to InDesign
Now is the time to make any changes to the content. Maybe you have spotted some errors; maybe you need to add further content. Go ahead and make those changes, but DO NOT add any styles, as any changes to style will not come through.
Hopefully, you will see where we are going with this.
Here is the workflow then
- Work in InDesign and get things as you want.
- Be happy with the content and how everything looks on the page.
- Even be happy with a PDF - ready for print.
- Only when you reach this stage, export to ePub3.
- Unpack the ePub
- Edit the CSS that InDesign created (use Dreamweaver or Atom for this)
- You can remove many of the bespoke style rules for the objects at the end of the CSS file.
- Create a new CSS file from this edited one and save this somewhere with a different name but outside the ePub package.
- Go back to InDesign. Edit modestly. No new styles thanks.
- Export to ePub, but include your previously created CSS.
More Checks
How Does it Look?
You can evaluate the look of your new eBook by viewing in a number of ways:
- Adobe Digital Editions. Freely available from adobe.com
- Books app on Apple computers
- Readium is a browser eReader for Google Chrome
- iPad
Validation
We can check validation by uploading the file to this web site:
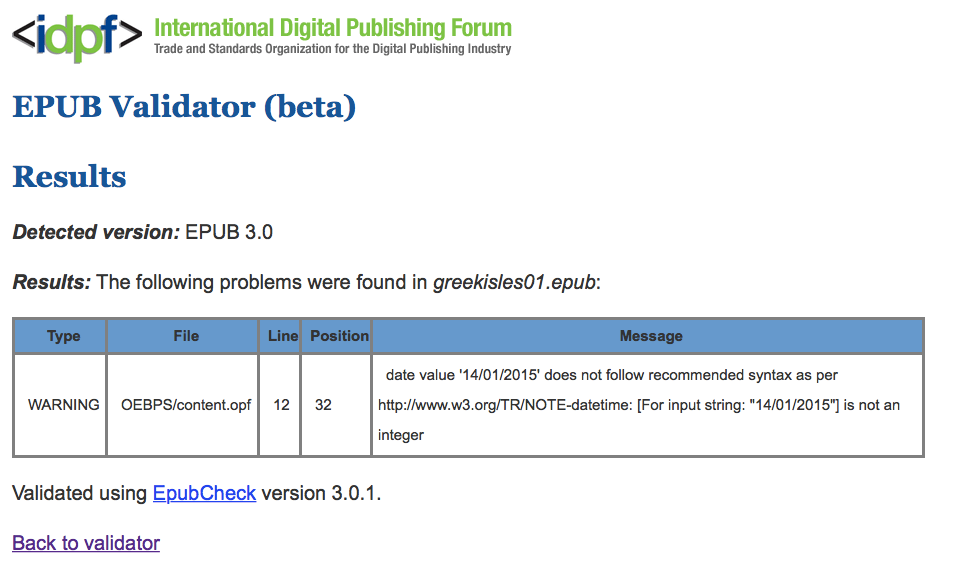
Here we see a failure error.
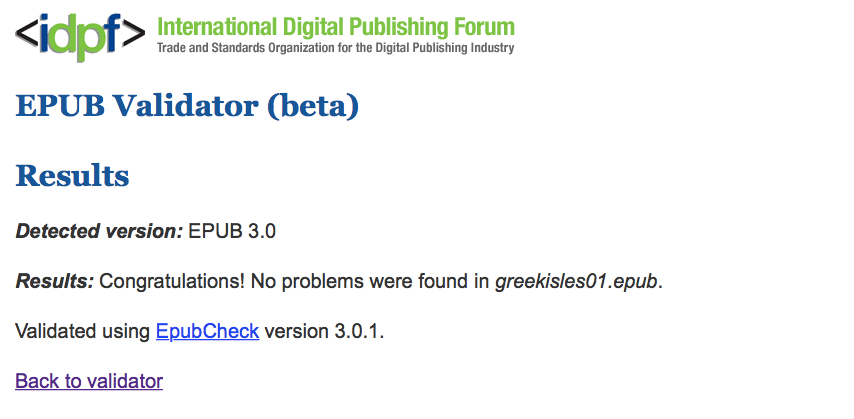
Fixed